
Clearing Acne with Tria Blue Light: Part 1 // MissBeautyEmily
15:21
Acne is embarrassing, confidence-breaking and just down right painful! I have always suffered from breakouts since a teen and I ended up on tablets when I was 17 to combat my issue. It cleared up like a dream and I decided to stop taking the medication as I was sure it was gone for good. Unfortunately the last year has decided to bring back awful breakouts that no spot treatment seems to be able to help! The majority of my acne seems to be on my chin and a couple on my cheeks. My chin is scarred with red blemishes from past breakouts and I just can't seem to get my skin under control to be spot-free again. I'm 21 so as you can imagine, having spots makes me feel like I'm forever stuck as a teenager and it just doesn't make me feel good going bare. I was very kindly contacted by Tria Beauty on whether I would like to trial their Acne Clearing Blue Light to which I jumped at the chance! Today's post is focused on the arrival of my device and a quick insight into my first treatment of the blue light. There will be a post in a few weeks time to discuss my results and whether the device is making any difference.
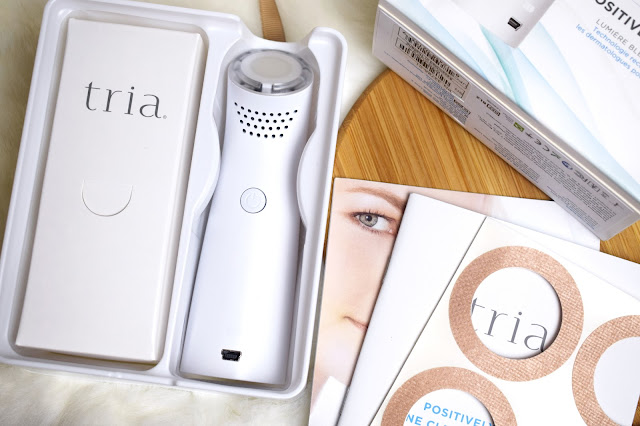

What's inside?
The blue light comes in a very compact box which contains everything you need to work the device. Pictured above you can see that the device is placed in a plastic insert with the charging cables beside. You also receive instruction manuals and sticker guides to place onto the skin. These come in so handy for when you use the device as it helps to keep you confined to one area on your face. The manuals are very helpful and you need to read them beforehand so you know what you are doing. Be sure to go over the steps until you know exactly what you're doing because even though I read it a few times first, I still ended up messing up on my patch test.
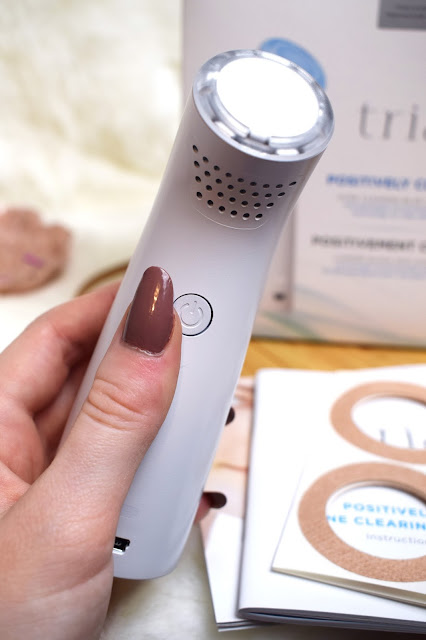
How do you carry out your patch test? It's really quite simple and is recommended to do 24hrs before you first treatment. I placed one of the sticky circle guides onto the crook of my arm and then switched the device on (one click of the button). I pressed the device window against the skin I was testing and immediately the blue light turns on along with the fan (which is all normal). Now this is the part where I went wrong so as I said before, be sure to read the steps a few times! You are meant to move the device around slowly within the circle guide for the duration of the time the device is on. I accidentally kept the device in the same spot and my skin kept getting very hot and I had to move it away which stops the device since it's not against the skin. It is normal for the skin to become warm but do not leave it in the same spot as it will get too hot to bear. The device will stay on for around 5 minutes before switching off. When the test is done, leave the skin for 24 hours and keep an eye out for any reactions.
How do you carry out your patch test? It's really quite simple and is recommended to do 24hrs before you first treatment. I placed one of the sticky circle guides onto the crook of my arm and then switched the device on (one click of the button). I pressed the device window against the skin I was testing and immediately the blue light turns on along with the fan (which is all normal). Now this is the part where I went wrong so as I said before, be sure to read the steps a few times! You are meant to move the device around slowly within the circle guide for the duration of the time the device is on. I accidentally kept the device in the same spot and my skin kept getting very hot and I had to move it away which stops the device since it's not against the skin. It is normal for the skin to become warm but do not leave it in the same spot as it will get too hot to bear. The device will stay on for around 5 minutes before switching off. When the test is done, leave the skin for 24 hours and keep an eye out for any reactions.

My First Treatment
Fast forward 24 hours and my patch test had remained normal so I knew that I could begin with my first treatment. I washed my face and dried it so it was clean and took one of the guides and popped it onto an area of my chin that currently has red blemishes and mild acne. The guides are sufficiently sized and allowed me to treat half of my chin. Like my patch test, I turned the device on and carried out the treatment by placing the device against my skin and slowly going around in circles until the device chimed. It only takes about 5 minutes for the whole of the treatment but it does feel like a while when all you're doing is rotating it but all I'm picturing is my skin being clear and that definitely gets me through it.
After that section was done, I decided to move the guide onto the second part of my chin since this seems to be my problem area. Both treatments went smoothly and the only sensation I felt was slight warming throughout but it wasn't uncomfortable. It is advised to pop on a cream to keep the skin soft and hydrated afterwards so I used my Charlotte Tilbury Magic Cream.

After that section was done, I decided to move the guide onto the second part of my chin since this seems to be my problem area. Both treatments went smoothly and the only sensation I felt was slight warming throughout but it wasn't uncomfortable. It is advised to pop on a cream to keep the skin soft and hydrated afterwards so I used my Charlotte Tilbury Magic Cream.

Next steps..
So what next? It takes around 2 weeks to see a visible improvement so I will be using this device daily for 14 days before I update you on my results. I'm keeping my fingers and toes crossed that it will sort out my mild acne and make me feel confident again.
If you can't wait and want to check out the product for yourself then feel free to look through their website here.
Have you ever tried this device or something similar? Let me know!
- Emily x
* I was sent the product for reviewing purposes only, all opinions are my own.
If you can't wait and want to check out the product for yourself then feel free to look through their website here.
Have you ever tried this device or something similar? Let me know!
- Emily x
* I was sent the product for reviewing purposes only, all opinions are my own.


5 comments
Good luck with your results girl! x
ReplyDeleteOhh this looks really interesting. Hope it works out for you! x
ReplyDeleteooo wow interesting! I feel lucky that I've never really had to deal with bad spots, but this still looks really cool x
ReplyDeleteEscapesAndEpiphanies | Travel Fashion Lifestyle
I feel lucky I don't suffer with acne or get many spots, this looks like a really great tool and I hope you see some improvement xx
ReplyDeletehttp://www.simplychlo.co.uk
This tria blue light tool sounds really neat. I hope you get some great results!
ReplyDelete